How it's made...
Pathfinding
There is a clear winner in the world of pathfinding, and it is the A* search algorithm, which is essentially an optimized version of Dijkstra's algorithm when looking for a specific target. However, the A* search algorithm has many variants. The implementation used here is fairly vanilla, except in it's handling of the hexagonal map representation discussed below.
Hexagonal Grid
The most common map representation is a square grid, due to it's ease of implementation. However, a square grid is a bit ambiguous when it
comes to visibility across a diagonal:
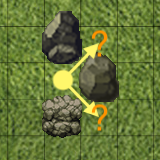
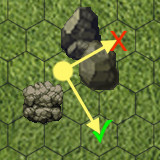
Therefore, a hexagonal grid is much better in this case, despite the extra effort.
Hexagons are the Bestagons.
So all path finding and visibility calculations are implemented using a hex grid.
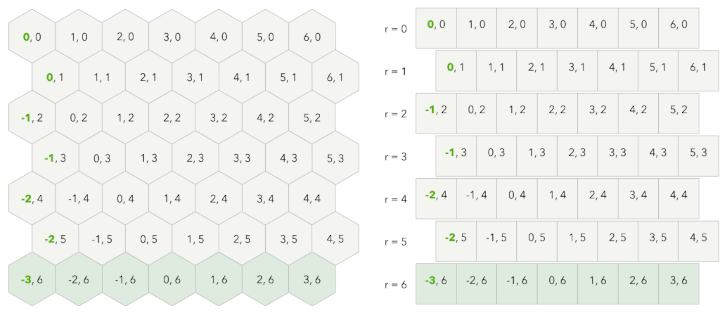
A normal 2D array is used to store the hex grid, where every other row is implicitly offset by half a cell.
Indexing into that array means doing a lot of conversion between world coordinates,
offset coordinates, and cubic coordinates.
You can find details on all of these (and so much more) in the definitive work on the subject:
Hexagonal Grids from Red Blob Games,
which is not only informative, but also interactive. I highly recommend it.
Path smoothing
The hex grid isn't a core gameplay element, but rather just a useful implementation for storing obstacles. So there is no reason the team members have to run precisely along that grid. Therefore, after the correct path is found on the hex grid, a node can be eliminated if there is direct line of sight between the previous node and the next node. Here's the C++ code:
std::vector HexGrid::smoothPath(const std::vector& path) const {
  std::vector smoothed;
  smoothed.push_back(path.back());
  for (int i=path.size()-2; i>=1; --i) {
      Point2D prev = smoothed.back();
      Point2D next = path[i-1];
      if (!lineOfSight(prev, next)) {
          smoothed.push_back(path[i]);
      }
  }
  smoothed.push_back(path.front());
  std::reverse(smoothed.begin(), smoothed.end());
  return smoothed;
} path coming from A* is
reversed from what you might expect, with the target at index 0, and the start at the end. This is
also helpful when traversing the path, because nodes can be popped off the back of a
std::vector faster than the front.)
Visibility
The visiblity method implemented here is based on Clark Verbrugge’s Hex Grids, section (7) Euclidean Field of View (FOV) on a Hexagonal Grid. Here's an analogy to help describe the method:
Imagine the hex grid was a big uncut pizza. We will cut the pizza into 6 slices 🍕, with the center-point
being wherever you are standing.
We then test these slices against the next hex "ring" outward from that center cell for obstacles. If there are any
obstacles, we subdivide that slice into two slices, one on the left of the obstacle, and one on the right of the obstacle.
If one of the slices gets too thin, just throw it out. Then go to the next outward hex "ring" and test all the slices again.
When all the slices are too thin... we are done.
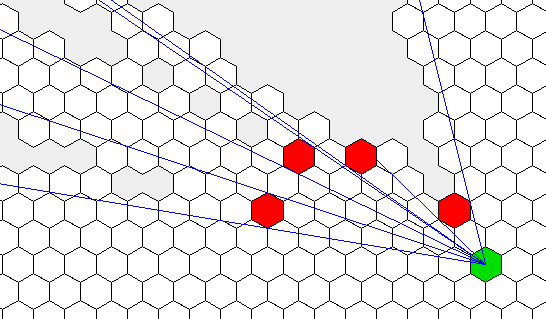
(image from Nontransitive dices and Japanese rock garden)
This FOV method is performed for each member of each team, creating a shared visibility per team. By clicking on this link you will enable the options menu to see the visibility for the blue team, or disable it completely.
Team AI
Each team calculates how many of its members are "controllable"... meaning they aren't jailed, captured, or capturing an opponent. Based on this number of controllable members, it sets each to one of three roles:
- Defense: seek any opponents in their side of the field.
- Offense: randomly search for the flag. When found, grab it and get it across the line. All while avoiding any opposing defenders.
- Rescue: Get to the jailed team members and free them, while avoiding opposing defenders.
Webassembly
Like all visual simulations on this site, this project was programmed using C++, compiled with clang targeting Webassembly. Why C++ you ask? Because it allows me to manage and access memory in a more optimized way. It's challenging, the tools can be somewhat rudementary. But since the last project I was able to find a good debugger, which was invaluable for this project.